
This Golden Oreo Birthday Cake is packed with crushed golden Oreo cookies, colorful sprinkles, and topped with a creamy frosting that’s perfect for any birthday recipe. A funfetti-meets-Oreo dream cake!
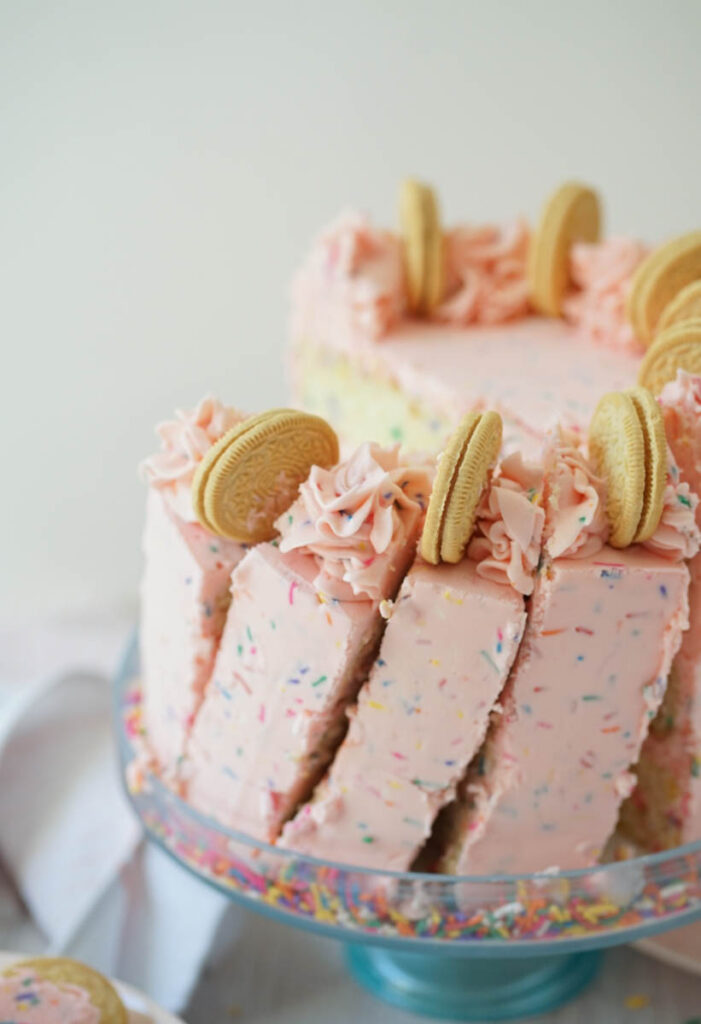
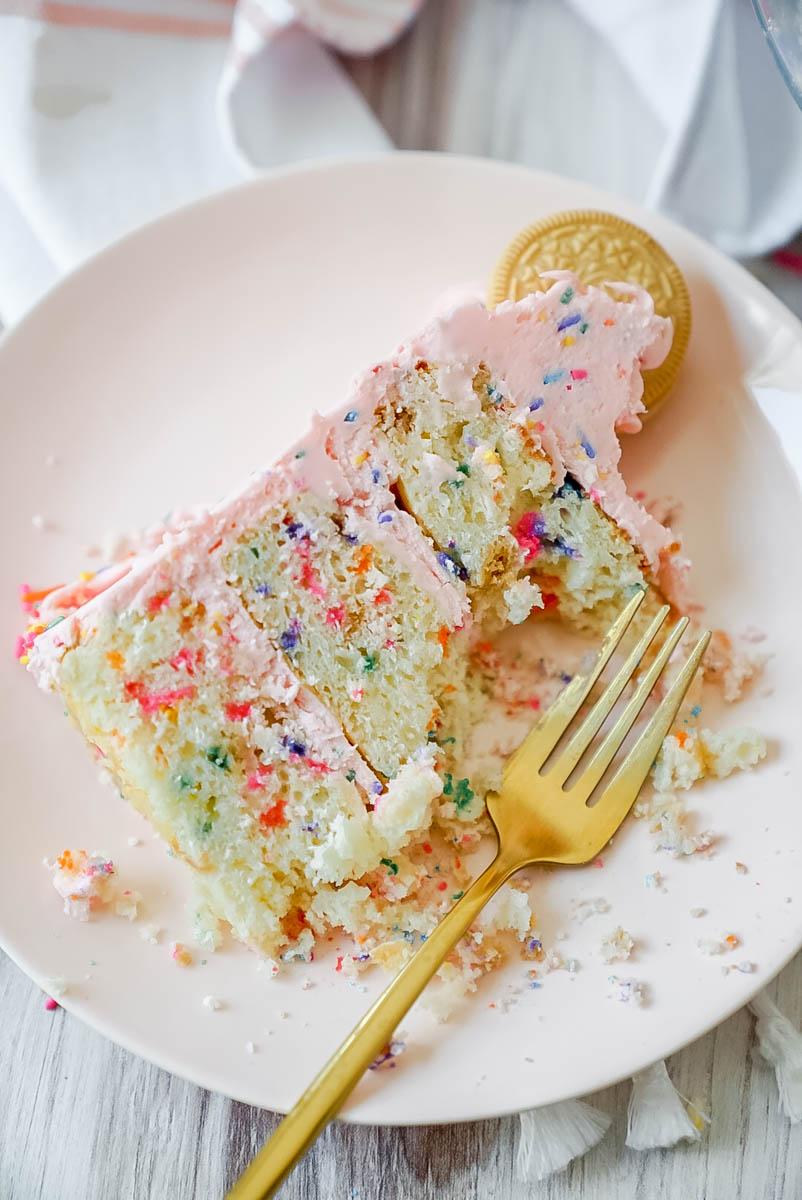
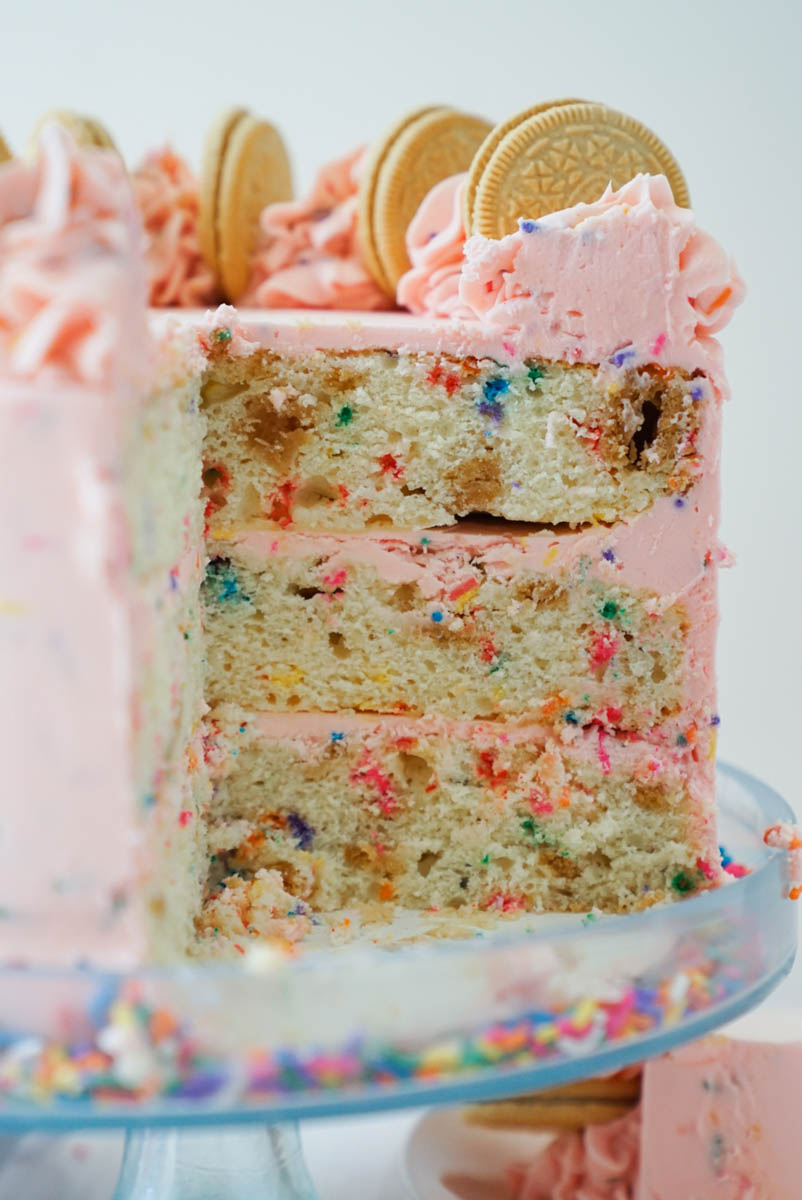
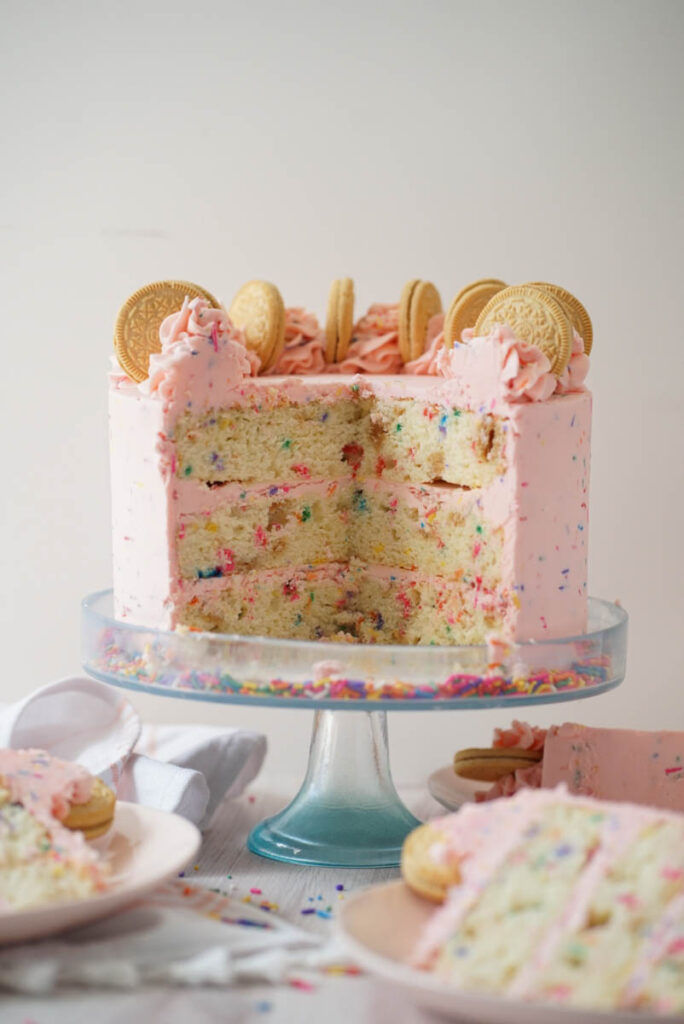
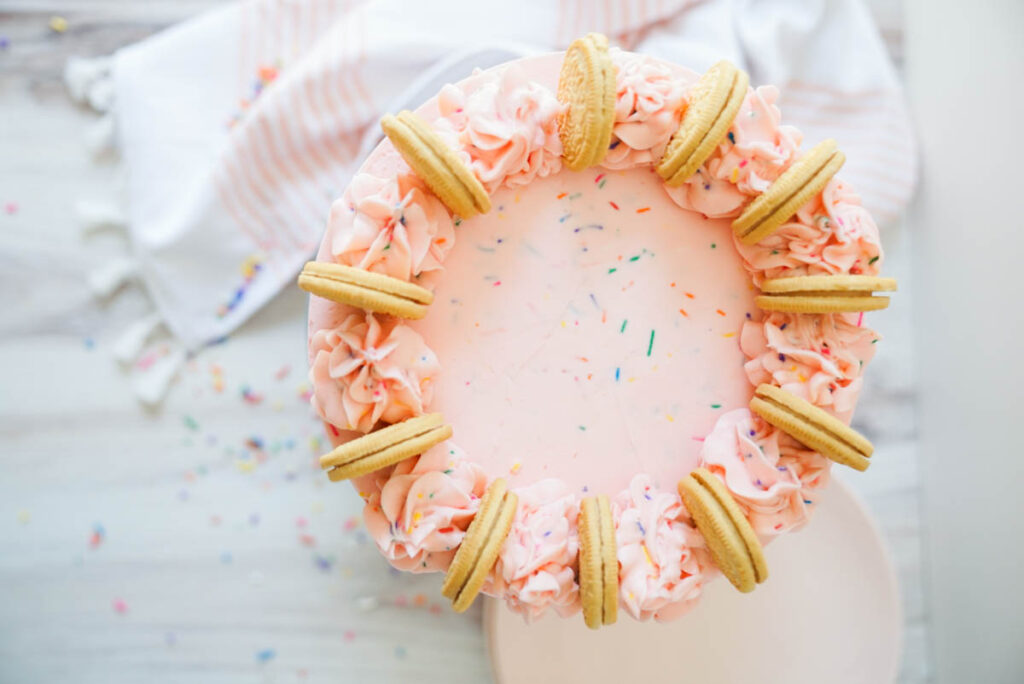
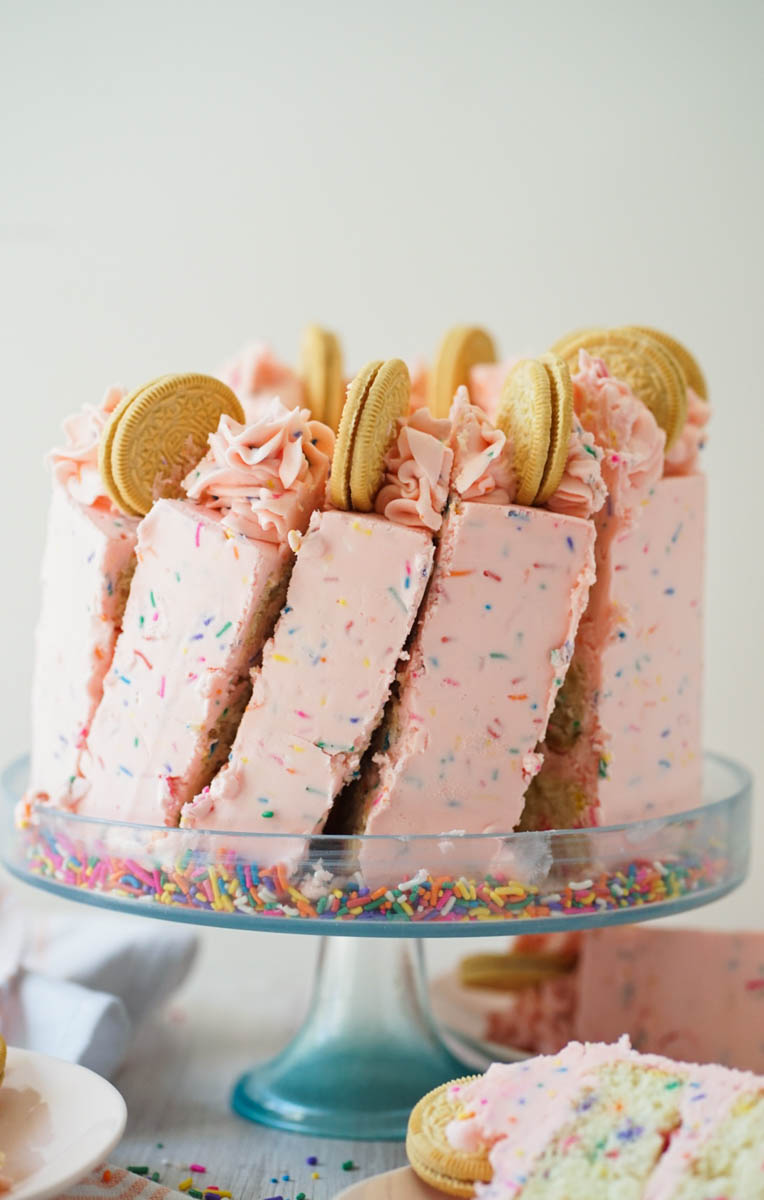
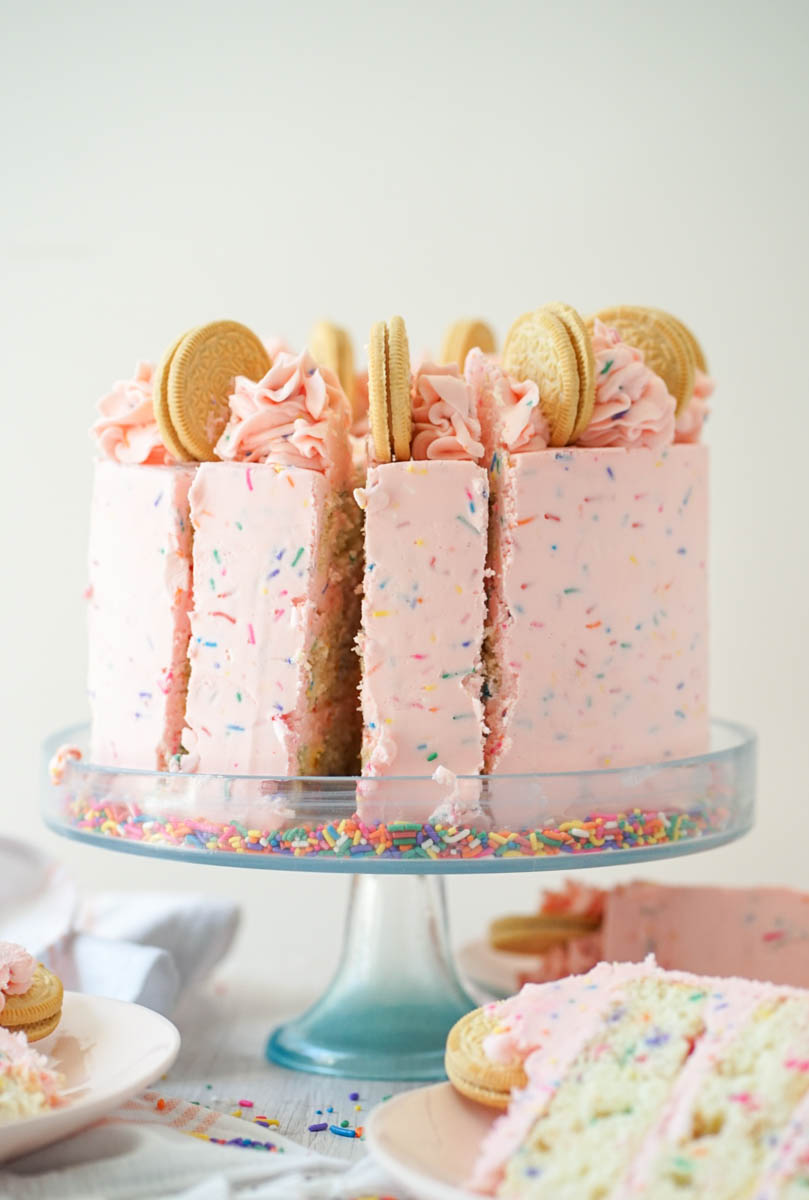
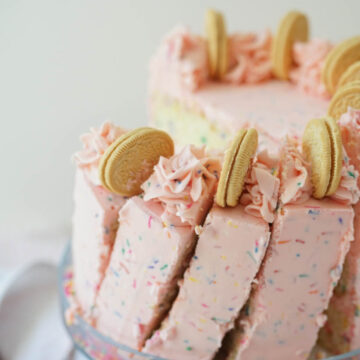
This Golden Oreo Birthday Cake is the only birthday cake you’ll ever need. It’s like Oreo meets funfetti and has a delicious baby. It has soft vanilla cake layers packed with chopped Golden Oreo cookies and colorful sprinkles, topped with a creamy frosting that’s lightly pink and totally party-worthy.
I originally made this cake for my own birthday—and let me tell you, it was perfect. If you’re looking for a birthday recipe that’s fun, nostalgic, and loaded with cookie pieces, this is it.
If you like this cake, you’ll definitely want to try these sweet treats next:
- The Best Birthday Golden Oreo Blondies Recipe
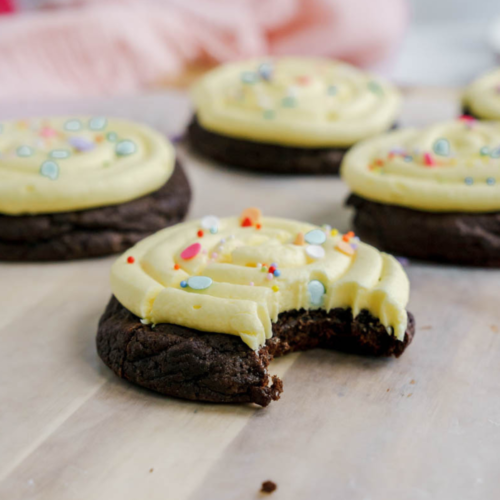
- Best Chocolate Birthday Cookies With Frosting
- Fun and Festive Birthday Cake Cookies
Why You’ll Love This Golden Oreo Birthday Cake
- So customizable – Keep it pink, or skip the food coloring. You can even switch the flavor by using limited edition Oreos for a twist.
- Golden Oreo cake layers – Crushed golden Oreo cookies are baked right into the vanilla cake, giving each slice a little crunch and flavor that tastes like a party.
- Colorful sprinkles – It wouldn’t be a birthday cake without rainbow sprinkles folded right into the batter.
- Creamy frosting – The buttercream is whipped until fluffy and includes a pinch of salt and rainbow sprinkles, giving it a cake batter-like vibe.
- Layered fun – This is a triple-layer golden Oreo birthday cake made in 8-inch pans, but you can also use three 6-inch or two 9-inch pans.
Ingredients that you will need
I’ve complied a list of some of the ingredients that you will need that you might not have on hand.
- Unsalted butter- For the cake batter, the butter will need to be room temperature.
- Eggs- I use extra large eggs, but you can also use large eggs. Make sure they are room temperature.
- Sour cream- I use full fat sour cream. It also needs to be room temperature.
- Cake flour- My favorite brand is Swan Silk, but any brand would work.
- Fresh baking powder- I buy fresh baking powder every month. It helps your cakes rise evenly.
- Buttermilk- You will use one cup. Make sure to pull it out 2-4 hours before you start baking.
- Golden Oreos- A family size pack of Oreos will do!
- Rainbow sprinkles- To be honest, Walmart has my favorite jimmy sprinkles. You can find them here:

Step-by-Step Instructions – Golden Oreo Birthday Cake
For the Cake:
- Preheat your oven to 325°F. Lightly spray the bottoms of three 8-inch cake pans, line with parchment paper, and spray again.
- In a medium bowl, whisk together cake flour, baking powder, and salt. Set aside.
- In a large bowl of your stand mixer, beat butter, oil, and granulated sugar on high speed until fluffy and light—about 3–4 minutes.
- On low speed, add eggs and egg whites one at a time, beating for 30 seconds after each addition. Scrape the sides of the bowl with a rubber spatula as needed.
- Add sour cream and clear vanilla extract. Mix until combined—even if it looks a little clumpy.
- With the mixer on low speed, alternate adding ⅓ of the dry ingredients with ½ of the buttermilk, beginning and ending with the dry ingredients. Mix just until combined.
- Fold in chopped Oreos and colorful sprinkles with a spatula.
- Evenly divide batter into pans and bake for 25–28 minutes, or until golden on top and a toothpick comes out with just a few moist crumbs.
- Let cakes cool for 15 minutes before turning them out onto a cooling rack.
- Once cooled completely, wrap each layer in plastic wrap and chill or freeze until you’re ready to decorate. (Tip: Use a freezer-safe bag if freezing for longer storage.)
For the Frosting:
- In a large bowl fitted with a paddle attachment, beat slightly chilled butter for 3 minutes on medium until pale and creamy.
- Add sifted powdered sugar and heavy cream. Mix on low speed until just combined.
- Add clear vanilla extract and a pinch of salt. Beat on medium speed for 3 minutes until light and fluffy.
- Mix in rainbow sprinkles and a handful of cookie pieces (optional).
- If desired, tint with AmeriGel Red for a soft pink hue.
- Beat the frosting by hand with a wooden spoon for 1–2 minutes to remove air bubbles before decorating.
To Assemble:
- Frost the top and sides of the cake with remaining frosting. Decorate with more Golden Oreo cookies or sprinkles on top of the cake.
- Place the first cake layer top side up. Spread 1 cup of frosting evenly over the top.
- Repeat with the second layer, then place the final layer top side down.
- Apply a thin crumb coat around the cake and chill for 10 minutes.
Tips and Tricks – Golden Oreo Birthday Cake
- Use a food processor to quickly crush your Oreos, or place them in a freezer-safe bag and crush with a rolling pin.
- Always check your baking powder—freshness matters!
- Chill your cake layers before frosting—it makes decorating way easier.
- Want to celebrate Oreo’s official birthday or just your own?? This is the ultimate Oreo golden birthday cake to make for it.
- Room temperature ingredients are non-negotiable! This ensures your batter emulsifies properly and bakes evenly. Cold ingredients = dense, sad cake.
- Don’t overmix the batter once the flour goes in—this can make your cake tough. Mix just until the streaks disappear
- Use a light-colored cake pan to avoid over-browned edges. Dark pans bake hotter and can dry out the cake edges.
- Sprinkle tip: Use jimmies (the long kind) for funfetti-style sprinkles. Nonpareils bleed color and can ruin your batter!
- Crumb coat confidence: Don’t skip this step—it locks in crumbs and gives you a smoother finish.
- Freezing layers = stability. Even chilling for 30 minutes makes a world of difference when stacking and decorating.
- Want neater slices?Chill the finished cake before slicing with a hot knife. Clean between each cut.
Recommended Tools
- Stand mixer with paddle attachment – for smooth batter and whipped buttercream
- Offset spatula – for even frosting application
- Cake turntable – helps with frosting and decorating like a pro
- Three 8-inch round cake pans – or 6-inch or 9-inch pans if modifying
- Parchment paper rounds – for perfect non-stick release
- Rubber spatula – for folding in sprinkles and Oreos without overmixing
- Cooling racks – so the cakes don’t steam in the pans
- Plastic wrap + freezer-safe bags – for storing cake layers
- AmeriGel food coloring – for that soft pink tint
- Serrated knife or cake leveler – if you need to level the tops
- Food processor – to quickly crush those Golden Oreos
FAQs
- Can I make this cake in advance? Yes! The cake layers can be baked, cooled, wrapped, and stored in the fridge for up to 5 days or the freezer for up to a month. You can also freeze the fully assembled cake.
- Can I use regular Oreos instead of Golden Oreos?
Totally! But it will change the flavor. Golden Oreos have a birthday cake-flavored creme with a rich chocolate-flavored creme filling that really complements the vanilla base. - Do I have to use cake flour?
It’s highly recommended. Cake flour gives you that tender, light texture that feels like a professional bakery cake. If you substitute all-purpose flour, it won’t be quite as silky. - What kind of sprinkles should I use?
Use jimmies (long sprinkles). Avoid nonpareils or sanding sugar, which can melt or bleed color. - Can I make this gluten-free?
You can try swapping the cake flour for a 1:1 gluten-free blend that includes xanthan gum. But I haven’t tested this variation yet! - How do I get flat cake layers?
You can bake the cakes at 325°F (as written) for a gentler rise and use cake strips to reduce doming. If needed, trim the top of the cakes with a serrated knife before stacking.
Storing your Cake
If I am dividing my Golden Oreo Birthday Cake making into multiple days, I bake my cake layers, cool them, and wrap them with plastic wrap and store them in the fridge or the freezer. This helps reduce crumbs and makes it so the layers don’t slide around when decorating. They can be stored in the fridge for 3-5 days.
Freezing
If you want to make the entire cake ahead of time, you can freeze the decorated cake by simply chilling it and then wrapping it with plastic wrap. If you want to store it for longer than a few days, put a layer of aluminum foil over the plastic wrap. It can be stored like this in the freezer for up to 6 months. Once you are ready to serve the cake, pull it out of the freezer and place it in the fridge to thaw, which will help decrease condensation.
Here are more recipes you will want to try
- Easy Birthday Brookies Recipe (Brownie + Cookie)
- Homemade Birthday Sprinkle Marshmallows Recipe
- Easy Birthday Cheesecake Cake Recipe
This Golden Oreo Birthday Cake is the ultimate birthday cake—perfect for a brunch birthday or any time you want something indulgent! If you try this recipe, leave a star rating and let me know how it turned out in the comments. Happy baking!


Don’t forget to save this recipe card and share it! I’d love to hear your feedback or answer any questions you have! Follow me on Instagram, Pinterest, and TikTok. I post so many fun things on all platforms.
Recipe
Golden Oreo Birthday Cake
Ingredients
For the cake
- 1 cup unsalted butter room temperature
- 1¾ cup granulated sugar
- ¼ cup vegetable oil
- 3 large whole eggs room temperature
- 3 large egg whites room temperature
- ⅓ cup sour cream room temperature
- 1 Tablespoon pure vanilla extract
- 3 cups cake flour
- 1 Tablespoon baking powder
- 1 teaspoon salt
- 1¼ cups buttermilk room temperature
- 8 crushed Golden Oreos
- ¼ cup rainbow sprinkles
For the buttercream
- 2 cups unsalted butter slightly chilled
- 6 cups powdered sugar sifted
- ¼ cup heavy whipping cream
- 2 teaspoons pure vanilla extract
- ½ cup rainbow sprinkles
- pinch salt
Instructions
For the cake
- Preheat the oven to 325 degrees. Prepare three 8-inch or four 6-inch round cake pans by lightly spraying the bottom of the pan with cooking spray. Line with parchment paper and spray again. Set aside.
- In a medium sized bowl, whisk together the flour, baking powder, and salt. Set aside.
- In the bowl of a stand mixer fitted with the paddle attachment, cream the butter, oil, and sugar on high until fluffy and smooth, about 4 minutes. With a rubber spatula, scrape the bottom and sides of the bowl.
- Add the eggs and the egg whites, one at a time, beating on medium speed after each addition. I usually beat each egg for about 30 seconds. Scrape the bowl after each addition. Once all the eggs/egg whites are added, beat for 30 more seconds.
- Add the sour cream and vanilla. Beat on medium low speed for a minute. If the mixture looks clumpy, don’t worry, once you add the flour mixture it will smooth out.
- Turn the mixer on low and add ⅓ of the flour and ½ of the buttermilk to the butter mixture and mix ON LOW until almost incorporated. Add another ⅓ of the flour and the rest of the buttermilk. Mix just until a few streaks of flour remain, then add the rest of the flour mixture. Mix just until the flour streaks are mostly gone.
- With a rubber spatula, fold in the sprinkles and the crushed Oreos.
- Evenly distribute the cake batter among the three 8-inch or four 6-inch pans and bake for 25-28 minutes or until a toothpick comes out with just a few moist crumbs on it or until it starts to get a little golden brown on top.
- Remove cakes from the oven and let them cool in the pans for 15 minutes before transferring them out of the pan and placing them on cooling racks.
- When cakes are completely cooled, wrap each cake layer individually with plastic wrap and stick it in the refrigerator or freezer until you’re ready to frost.
For the funfetti buttercream
- In the bowl of a stand mixer fitted with a paddle attachment, cream the butter for about 3 minutes on medium speed until the color lightens.
- Add the sifted powdered sugar and heavy cream. Mix on low, just until combined.
- Add the vanilla and salt, and beat on medium speed for 3 more minutes. The frosting will become lighter in color and texture.
- Add in the rainbow sprinkles and mix on low. If you want to dye your frosting pink, this is when you add the coloring. I add a tiny bit of ameri gel red.
- Before spreading the frosting on your cake, spend a couple of minutes mixing the buttercream by hand with a wooden spoon or a rubber spatula to push out the air pockets.
Assembly
- Place the first cake layer, top side up. Add about 1 cup of frosting. Spread over the cake layer as evenly as possible to the edges of the cake.
- Repeat this step until you get to the final cake layer, which you will lay top side down.
- Apply a thin coat of buttercream around the entire cake to lock in the crumbs. Freeze for about 10 minutes.
- After the crumb coat is set, continue frosting and decorating the cake. Decorate and garnish with Golden Oreo’s.
Kira says
Hey cake babe, I noticed that the step-by-step instructions includes baking soda, but it’s not listed in the recipe card. Which one is correct? Thanks!
Molly Murphy says
Sorry, I did not even see that! It is just baking powder!
Kira says
Thanks! Also, in one place it says 1c buttermilk but in the recipe card it says 1 1/4. Can you clarify? Last one I promise!
Molly Murphy says
1 1/4 cup! thank you for catching all of this! Sounds like the blog post needs a recipe update! i appreciate the feedback! thank you!
Kira says
One of the better cake recipes I’ve found! The Oreos add such a fun touch, perfectly sweet, two thumbs up by the ten year old birthday girl. Thanks!!