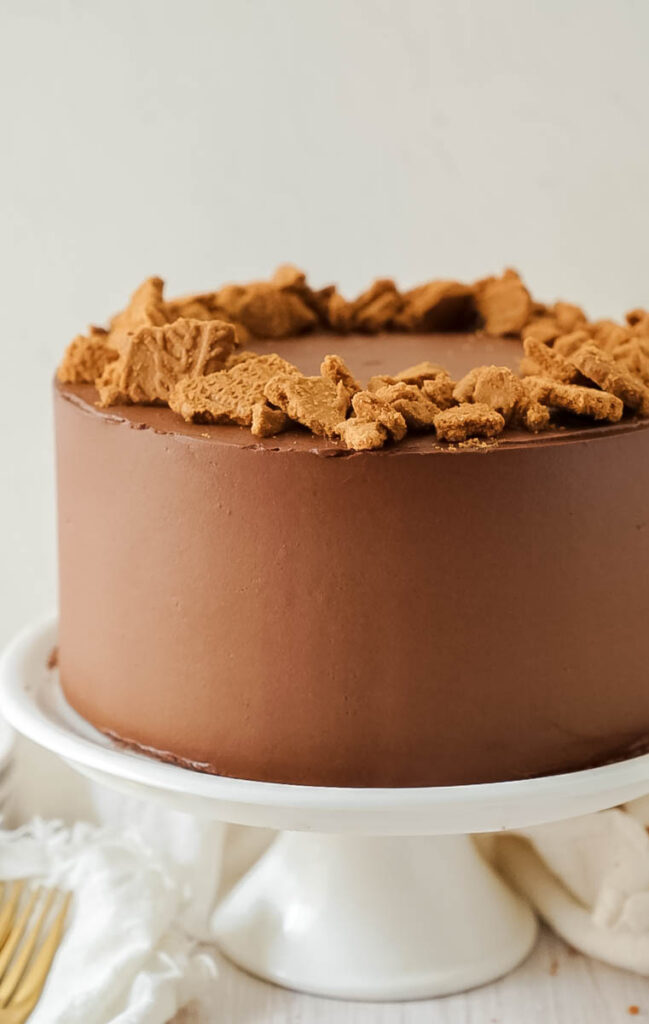
This Biscoff Fudge Cake has layers of Biscoff crumbs baked into the batter and it is topped with a rich and decant brownie batter buttercream.

If you are needing a deliciously decant dessert, this Biscoff Fudge Cake is for you. Chocolate and Biscoff just go together! The flavors pair well and compliment each other. With every bite you will want to come back for more.
For more recipes with Biscoff, here are some you might enjoy!
Banana Biscoff Cake, Ultimate Biscoff Cake, Biscoff Banana Bread
Jump to:
Why this recipe is so amazing
- Tender Biscoff layers-I put ground Biscoff cookies right into the cake layers to give them that delicious Biscoff taste.
- Brownie batter buttercream– I decided to go little heavier on the chocolate flavor to really create a true brownie flavor.
- Layered cake-This is a three layer 8 inch cake, but if you have four 6 inch pans, that will also work.
- The perfect dessert for any occasion-Whether this is a dessert just for the family or a fun friend get together, you’re going to need this one in your life.
Step by step instructions:
STEP 1: Beat the butter, sugar, and oil. Beat these ingredients on high for 5 minutes to get a light and fluffy texture. This creates air pockets in your cake that also helps it rise. I recommend beating it for 2 minutes, then scraping down the sides, and beating for the remaining 3 minutes.
STEP 2: Beat the eggs. Beating the eggs after each addition is considered the “creaming method.” You’ll want to scrape down the bowl after each egg to really ensure that they are creamed into the butter and sugar.
STEP 3: Add the vanilla extract. After adding the eggs, add the vanilla extract.
Step 4: Add in the dry ingredients and buttermilk. Alternate these and mix on low.
Step 5: Bake the cake. Bake the cake layers low and slow for 30-35 minutes, depending on your oven. Mine took 30 minutes.
Step By Step- Brownie batter buttercream
Step 1: Melt the Chocolate. In a microwave safe bowl, heat the chocolate for 30 seconds, stir, heat for 30 more seconds, and set aside. The chocolate will not be melted all the way, but this will help it melt quicker when you add the cream.
Step 2: Heat and pour the cream. In another microwave proof bowl, heat the cream until nearly boiling. Make sure it doesn’t boil over. Pour the hot cream over the slightly warm chocolate chips. Let it sit for 2 minutes and then stir. Set aside.
Step 3: Beat the butter. In the bowl of a stand mixer fitted with the paddle attachment, beat the butter for about 2 minutes on medium-high speed.
Step 4: Add the ganache mixture. Add the chocolate/cream mixture. Scrape down the sides and bottom of the bowl with a rubber spatula and beat for 1 more minute.
Step 5: Add the rest of the ingredients. Add the powdered sugar, vanilla, and salt. Mix on low until combined, then turn the mixer to medium high and beat for 3 minutes.
Step 6: Beat out the air pockets. With a wooden spoon or rubber spatula, beat by hand to mix out any air pockets.
Hint: If you want to add additional piping on the top of the cake, I suggest making an additional half batch.
Tips for assembly
- Level the cakes, if needed. I like to frost my cake chilled or frozen.
- Place the first cake layer on a cake board, top side up. Gently and evenly spread about a cup of the buttercream over the cake layer.
- Repeat this step with the second cake layer.
- Place your final cake layer, top side down.
- Apply a thin layer of the chocolate buttercream around the entire cake and freeze the cake for 10 to 15 minutes.
- Once the crumb coat is set, finish frosting and decorating the cake with the remaining chocolate buttercream. Serve at room temperature.
Expert Baking tips
-Make sure that your ingredients for the cake are at room temperature. This will help your cakes rise properly in the oven.
-You can make everything ahead of time and assemble it on the day that you are ready to serve it.
-SIFT your powdered sugar. This is a step you seriously don’t want to miss out on. It helps keep your buttercream smooth and SILKY.
-Use high quality cake pans. My favorite trusted brand is FAT DADDIOS. You can find them here!
Storing and freezing
Storing your Cake
If I am dividing my Biscoff Fudge cake making into multiple days, I bake my cake layers, cool them, and wrap them with plastic wrap and store them in the fridge or the freezer. This helps reduce crumbs and makes it so the layers don’t slide around when decorating. They can be stored in the fridge for 3-5 days.
Freezing
If you want to make the entire cake ahead of time, you can freeze the decorated cake by simply chilling it and then wrapping it with plastic wrap. If you want to store it for longer than a few days, put a layer of aluminum foil over the plastic wrap. It can be stored like this in the freezer for up to 6 months. Once you are ready to serve the cake, pull it out of the freezer and place it in the fridge to thaw to help decrease condensation.
If you need some other recipes to try, here are some great ones:
Graham Cracker Smores Cake, White Chocolate Caramel Pretzel Cake, Blueberry Crisp Cake
Recipe

Biscoff Fudge Cake
Ingredients
For the Biscoff cake layers
- 22 Biscoff Cookies pulverized to a fine crumb
- 2 ¼ cups all-purpose flour
- 2 teaspoons baking powder
- 1 teaspoon baking soda
- 1 teaspoon salt
- 1 cup unsalted butter room temperature
- 1 ⅔ cups light brown sugar packed
- ¼ cup vegetable oil
- 4 large or extra large eggs at room temperature
- 1 teaspoon vanilla
- 2 cups buttermilk at room temperature
For the fudgy buttercream
- 2 cups unsalted butter slightly chilled
- ¾ cup unsweetened baking cocoa sifted
- 1 teaspoon salt
- 4 ½ cups powdered sugar sifted
- ¾ cup heavy cream
- 2 cups dark chocolate
Instructions
For the Biscoff Cake layers
- Preheat the oven to 325 degrees F. Using 3, 8 inch cake pans, spray the bottom of the cake pan with cooking spray, line with parchment paper, and spray again. Set aside.
- Place the Biscoff cookies in a blender and blend until the cookies are finely ground into a fine crumb.
- In a medium-sized bowl, whisk together the Biscoff crumbs, all-purpose flour, baking powder, baking soda, and salt until evenly combined.
- In the bowl of a stand mixer fitted the paddle attachment, cream the butter, brown sugar, and oil on medium speed until light and fluffy, about 5 minutes. The mixture will start looking light in color.
- Add the eggs, one at a time, beating on medium speed for 30 second after each addition. Add the vanilla and mix on the lowest speed, just until combined.
- With the mixer on the lowest speed, add ⅓ of the dry ingredients and half of the buttermilk. Mix just until combined. Repeat this step. Add the rest of the flour mixture and continue to mix on the lowest speed until the flour and the buttermilk have all been incorporated. With a rubber spatula scrape down the sides and bottom of the bowl and slowly mix by hand.
- Divide the batter evenly among your pans, (about 20 ounces in each pan) and bake for about 30-35 minutes. To check, insert a toothpick. Once little to no crumbs come out on your toothpick, the cakes are done. Because of the cookies and the brown sugar in this recipe, the cake layers will brown on top. That is normal and what you want.
- After they are out of the oven, I let mine cool for 15 minutes. Then I transfer them onto a wire rack to finish cooling. Let them come to room temperature before wrapping them in plastic wrap and freezing or refrigerating.
For the fudgy buttercream
- In a microwave safe bowl, heat the chocolate for 30 seconds, stir, heat for 30 more seconds, and set aside. The chocolate will not be melted all the way, but this will help it melt quicker when you add the cream.
- In another microwave proof bowl, heat the cream until nearly boiling. Make sure it doesn’t boil over. Pour the hot cream over the slightly warm chocolate chips. Let it sit for 2 minutes and then stir. Set aside.
- In the bowl of a stand mixer fitted with the paddle attachment, beat the butter for about 2 minutes on medium-high speed.
- Add the chocolate/cream mixture. Scrape down the sides and bottom of the bowl with a rubber spatula and beat for 1 more minute.
- Add the powdered sugar, vanilla, and salt. Mix on low until combined, then turn the mixer to medium high and beat for 3 minutes.
- With a wooden spoon or rubber spatula, beat by hand to mix out any air pockets.
Assembly
- Level the cakes if needed. I like to frost my cake chilled or frozen.
- Place the first cake layer on a cake board, top side up. Gently and evenly spread about a cup of the buttercream over the cake layer.
- Repeat this step with the second cake layer.
- Place your final cake layer, top side down.
- Apply a thin layer of the chocolate buttercream around the entire cake and freeze the cake for 10 to 15 minutes.
- Once the crumb coat is set, finish frosting and decorating the cake with the remaining chocolate buttercream. Serve at room temperature.

Leave a Reply